Autopilots and flight modes
UAT 206 Fundamentals of Control and Autopilot Systems
Lesson
By the end of this module you will be able to
- Explain the cascaded multicopter control structure of PX4 and ArduPilot
- Identify the key parameters of each control loop
- Link flight modes to the control loops active in each mode
- Compare parameter files and check changes before writing them to the vehicle
Why this matters
An autopilot has thousands of parameters and dozens of flight modes. Knowing which mode uses which loop, and which parameters control which loop, lets you fix problems at the right place. For example, oscillation in every mode points to an inner loop, while oscillation only in Position mode points to the position and velocity loops.
Cascaded control
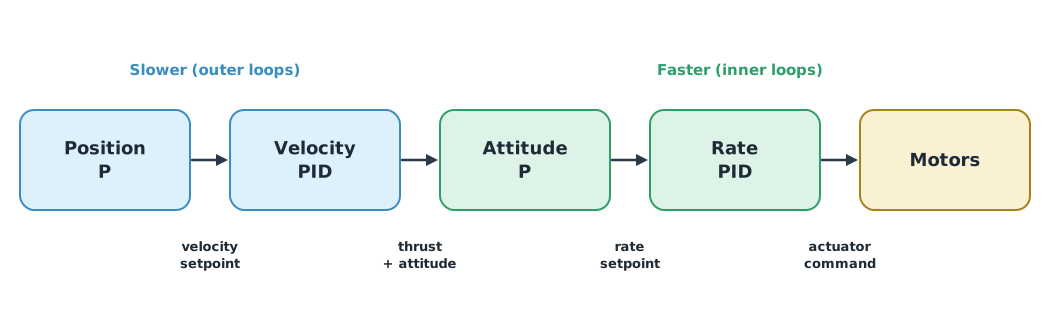
PX4’s Controller Diagrams page describes a standard cascaded control architecture:
- Position: a P controller turns position error into a velocity setpoint (
MPC_XY_P,MPC_Z_P). - Velocity: a PID controller turns it into an acceleration or thrust setpoint (
MPC_XY_VEL_P_ACCand so on), with clamping anti-windup. - Attitude: a quaternion-based P controller turns it into a rate setpoint (
MC_ROLL_Pand so on). - Rate: a PID controller with a derivative filter turns it into actuator commands (
MC_ROLLRATE_P/I/D/K).
ArduPilot follows the same idea: an angle P controller (using a square-root controller) feeds a rate PID. The parameters are ATC_ANG_RLL_P and ATC_RAT_RLL_P/I/D, with filters ATC_RAT_RLL_FLTT, FLTE and FLTD, running at 400 Hz on a Pixhawk.
Åström and Murray (2021), section 15.4, explain that cascaded control is designed loop by loop starting with the inner loop. A tight inner loop reduces the effect of disturbances and simplifies the outer loop design, and when the inner loop saturates, the outer loop’s anti-windup must be told.
Flight modes and active loops
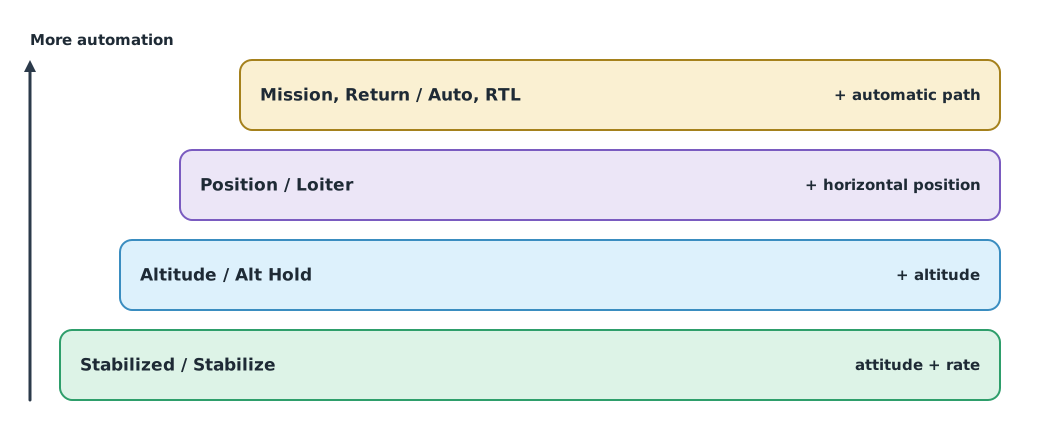
A flight mode decides at which loop the pilot or the automation gives commands. The more automated the mode, the more outer loops are active.
- Stabilized (PX4) / Stabilize (ArduPilot): the pilot commands tilt and throttle directly; only the attitude and rate loops run.
- Altitude / Alt Hold: adds the altitude loop; centre throttle holds height.
- Position / Loiter: adds horizontal position; releasing the sticks holds the drone in place.
- Mission, Return / Auto, RTL: the system generates its own path and uses every loop.
The ArduPilot guide recommends beginners progress from Stabilize to Alt Hold, Loiter, RTL and Auto. PX4 groups modes into manual modes such as Position, Altitude, Stabilized and Acro, and autonomous modes such as Hold, Return, Mission, Takeoff, Land and Offboard.
Example 1 Which loops each mode uses
A simple table helps isolate problems: if a symptom appears in every mode, the cause is likely in a loop all modes share.
LOOPS = ["rate", "attitude", "altitude", "horizontal position", "path"]
MODES = {
    "Stabilized / Stabilize": 2,
    "Altitude / Alt Hold": 3,
    "Position / Loiter": 4,
    "Mission / Auto": 5,
}
for mode, n in MODES.items():
    print(f"{mode:<24} active loops: {', '.join(LOOPS[:n])}")

symptom_modes = ["Position / Loiter", "Mission / Auto"]      # modes where the drone wanders
common = set(LOOPS)
for m in symptom_modes:
    common &= set(LOOPS[:MODES[m]])
fine = set(LOOPS[:MODES["Altitude / Alt Hold"]])              # mode that flies normally
print("suspect loops:", sorted(common - fine))
Stabilized / Stabilize active loops: rate, attitude
Altitude / Alt Hold active loops: rate, attitude, altitude
Position / Loiter active loops: rate, attitude, altitude, horizontal position
Mission / Auto active loops: rate, attitude, altitude, horizontal position, path
suspect loops: ['horizontal position']If the drone wanders only in Position and Mission but Altitude is fine, the loop to suspect is horizontal position, not the rate loop.
Managing parameter files
Always save the original parameter file before changing anything. Mission Planner has Save to file, Load from File and Compare Params, which compares the vehicle’s values with a file and lets you choose which to change; you still have to press Write Params to send them to the vehicle. QGroundControl can also save and load parameter files.
Example 2 Checking changes between two parameter files
ArduPilot’s NAME,VALUE file format; the before and after values are hypothetical.
before = """ATC_RAT_RLL_P,0.135
ATC_RAT_RLL_I,0.135
ATC_RAT_RLL_D,0.0036
ATC_RAT_RLL_FLTD,20
ATC_ANG_RLL_P,4.5
INS_GYRO_FILTER,20"""
after = """ATC_RAT_RLL_P,0.19
ATC_RAT_RLL_I,0.19
ATC_RAT_RLL_D,0.004
ATC_RAT_RLL_FLTD,20
ATC_ANG_RLL_P,6.0
INS_GYRO_FILTER,40"""
LIMIT = 30.0                                  # % changes above this need review before flight

def parse(text):
    return {name: float(value) for name, value in (line.split(",") for line in text.splitlines())}

old, new = parse(before), parse(after)
for name in sorted(old.keys() | new.keys()):
    a, b = old.get(name), new.get(name)
    if a == b:
        continue
    pct = (b - a) / a * 100
    flag = "REVIEW" if abs(pct) > LIMIT else ""
    print(f"{name:<18} {a:>8g} -> {b:<8g} {pct:+6.1f}% {flag}")
ATC_ANG_RLL_P 4.5 -> 6 +33.3% REVIEW
ATC_RAT_RLL_D 0.0036 -> 0.004 +11.1%
ATC_RAT_RLL_I 0.135 -> 0.19 +40.7% REVIEW
ATC_RAT_RLL_P 0.135 -> 0.19 +40.7% REVIEW
INS_GYRO_FILTER 20 -> 40 +100.0% REVIEWSeveral large changes at once make it impossible to tell which one changed the behaviour. Change one value or one group at a time, and test in SITL first.
Module lab
Lab: exploring parameters and modes in SITL
- Start PX4 or ArduPilot SITL, connect QGroundControl or Mission Planner and save the default parameter file.
- Find the parameters for every loop in Figure 1 in the software, noting default values and units.
- Fly in each mode and note what each stick axis means in each mode.
- Raise the rate-loop P by 20% at a time, save the file and compare with the code from Example 2.
- Use Compare Params, or compare files by hand, before loading the original values back.
Common mistakes
Watch out
- Not saving the original parameter file before editing.
- Copying parameters across firmware versions or between drones.
- Changing many values at once.
- Fixing an outer loop when the problem is an inner loop.
- Switching modes in the air without knowing what the sticks will now mean.
Summary
- PX4 cascades position P → velocity PID → attitude P → rate PID; ArduPilot uses angle P → rate PID.
- Design and tune from the inner loop outwards.
- Flight modes differ in which loops are active, which helps isolate faults.
- Save, compare and change parameters a little at a time.
Check your understanding
- In PX4’s structure, what does the velocity controller pass to the next stage?
- Which loop does ArduPilot’s Alt Hold add to Stabilize?
- The drone shakes in every mode. Which loops should be suspected first?
- A parameter changes from 0.135 to 0.19. What percentage is that?
- Does Mission Planner’s Compare Params write values to the vehicle immediately?
Answers
- An acceleration or thrust setpoint, converted into attitude and thrust.
- The altitude loop.
- The rate or attitude loops, which every mode shares.
- No; Write Params must be pressed first.
Key formulas
| Relative parameter change |
Key references
- PX4 Autopilot. Controller diagrams. PX4 user guide (main). link
- ArduPilot Dev Team. Copter attitude control. ArduPilot developer documentation. link
- PX4 Autopilot. Flight modes (multicopter). PX4 guide (main). link
- ArduPilot Dev Team. Flight modes. ArduPilot Copter documentation. link
- ArduPilot Dev Team. Tuning process instructions. ArduPilot Copter documentation. link
- ArduPilot Dev Team. Mission Planner configuration and tuning. Mission Planner documentation. link
- Åström, K. J., & Murray, R. M. (2021). Feedback systems: An introduction for scientists and engineers (2nd ed.). Princeton University Press. link
Further reading
Study the assigned knowledge units in advance, review media and take the module quiz
In class / field
Lab or field practice from worksheets with a safety checklist
Learning evidence: Checked worksheets and quiz results