Simulators and flight skills
UAT 201 Fundamentals of Unmanned Aircraft Systems
Lesson
By the end of this module you will be able to
- Choose a simulator to suit the goal, whether FPV practice, line-of-sight flying or SITL
- Set up a transmitter as a USB joystick, check its axes, and explain Mode 1 and Mode 2 stick layouts
- Explain why commands look reversed when the nose points at the pilot, and calculate travel direction from heading
- Record and analyse practice results under consistent conditions
Why this matters
Most beginners’ mistakes happen in the first few seconds, such as pushing the stick the wrong way when the nose points at them, or panicking and cutting the throttle. In a simulator you just press restart; with a real drone you may lose the aircraft and injure someone. Systematic practice in a simulator is therefore the first step before touching a real drone.
Choosing a simulator by goal
| Goal | Kind of simulator | Evidence of learning |
|---|---|---|
| FPV hand skills | A sim viewed through an onboard camera, with a USB transmitter | Modes, control axes and number of crashes |
| Line-of-sight flying | A sim with the view from a pilot on the ground | Mistakes when the nose points at the pilot |
| Mission testing | SITL with a ground station | Planned route compared with the logged route |
SITL (software in the loop) runs the real flight-control software on a computer with an aircraft model. On Windows it is easiest to start from the Simulation tab of Mission Planner; QGroundControl works with both PX4 and ArduPilot on Windows, macOS, Linux, Android and iOS.
Passing simulator exercises does not confirm readiness to fly for real, and realistic graphics do not mean forces, wind and batteries are realistically modelled.
Transmitters and stick layouts
Many transmitters can connect to a computer over USB as a joystick, which is separate from the radio protocol used to talk to the receiver on the drone. Before practising, check each axis in turn for correct name, direction and end points. Some charging cables carry power only, so use a data cable.
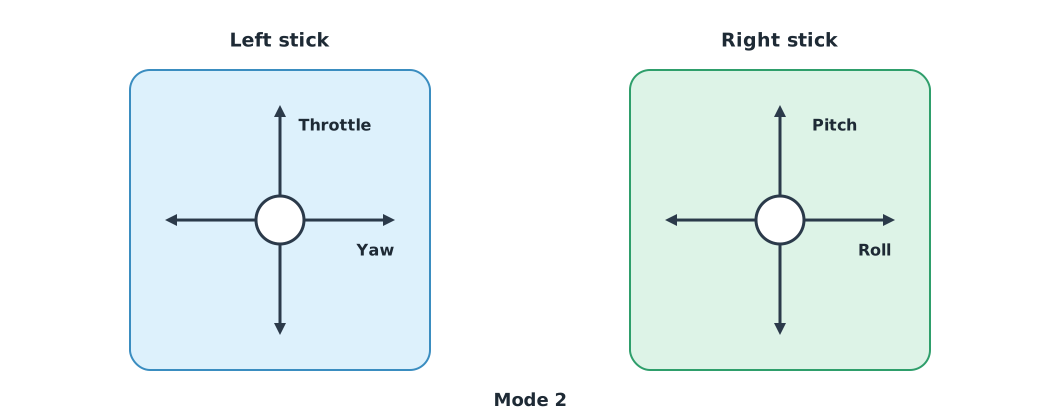
According to the ArduPilot documentation, Mode 2 uses the left stick for throttle and yaw and the right stick for pitch and roll, while Mode 1 uses the left stick for pitch and yaw and the right for throttle and roll. The PX4 documentation notes that Mode 2 is more popular. A team should use the same mode from practice through to real flight.
When the nose points at you
Sticks command relative to the aircraft, not the pilot. Pushing roll right means “go to the drone’s right”. With the nose pointing away, the drone’s right is your right; with the nose pointing towards you, the drone’s right is your left.
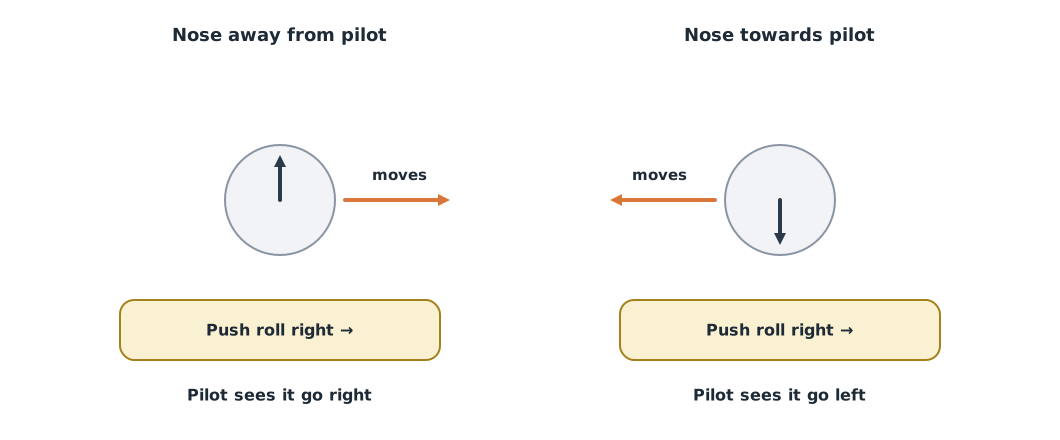
Example 1 Push roll right for 5 m: where does the drone go?
The pilot stands facing north; heading is measured clockwise from north.
import math

distance = 5.0
for heading in (0, 90, 180, 270):
    move = math.radians(heading + 90)                    # the drone's right
    east = round(distance * math.sin(move), 6) + 0.0        # + 0.0 removes the −0.0 sign
    north = round(distance * math.cos(move), 6) + 0.0
    seen = "right" if east > 0.01 else "left" if east < -0.01 else ("away" if north > 0 else "towards you")
    print(f"heading {heading:>3}°: east {east:+.1f} m, north {north:+.1f} m -> pilot sees it move {seen}")
heading 0°: east +5.0 m, north +0.0 m -> pilot sees it move right
heading 90°: east +0.0 m, north -5.0 m -> pilot sees it move towards you
heading 180°: east -5.0 m, north +0.0 m -> pilot sees it move left
heading 270°: east +0.0 m, north +5.0 m -> pilot sees it move awayThe same command can send the drone in four directions depending on heading, so trainees must learn to think from the drone’s point of view. It helps to imagine sitting on the drone, or to practise flying circles around yourself to see the nose in many directions.
Practice with evidence
Record the conditions every time: sim, simulated aircraft, scene, flight mode, sensitivity and any assists. If conditions change, better results may come from an easier scene rather than better skill.
Example 2 Analysing a take-off-and-land practice log
The same task every round: take off, fly to a point 20 m away, turn the nose towards yourself and land back on the take-off pad, in Stabilize mode.
log = [  # (round, crashes, time s, landed on pad, wrong-way roll corrections)
    (1, 3, 95, False, 4), (2, 2, 88, False, 3), (3, 1, 80, True, 2),
    (4, 1, 76, True, 1), (5, 0, 71, True, 1), (6, 0, 69, True, 0),
]
first, last = log[:3], log[3:]
avg = lambda rows, i: sum(r[i] for r in rows) / len(rows)
print(f"rounds 1-3: crashes {avg(first, 1):.1f}, time {avg(first, 2):.0f} s, wrong-way roll {avg(first, 4):.1f}")
print(f"rounds 4-6: crashes {avg(last, 1):.1f}, time {avg(last, 2):.0f} s, wrong-way roll {avg(last, 4):.1f}")
print("landed on the pad:", sum(r[3] for r in log), "of", len(log))
rounds 1-3: crashes 2.0, time 88 s, wrong-way roll 3.0
rounds 4-6: crashes 0.3, time 72 s, wrong-way roll 0.7
landed on the pad: 4 of 6Every measure improves, but six rounds by one trainee only show progress under these conditions. Record events in words too: “round 2, nose towards me, corrected roll the wrong way twice” is more useful than “still not flying well”.
Module lab
Lab: simulator flight practice
- Connect a transmitter to the computer over USB, check each axis in the operating system and in the sim, and record the device name, sim version and Mode used.
- Practise taking off and landing on the same spot three times, then fly with the nose away, sideways and towards you.
- Fly the task in Example 2 at least 6 times, record it in a practice log, and analyse it with the code.
- Start SITL in Mission Planner and fly in Loiter compared with Stabilize, recording what the mode helps with.
- Have a partner observe and note events, then choose one behaviour to correct in the next round.
Common mistakes
Watch out
- Not checking axes before practising, so you practise with a reversed axis
- Changing sim, scene or mode and then comparing scores with earlier rounds
- Practising only with the nose pointing away, never towards you
- Believing that passing the sim means ready to fly for real
- Connecting the practice transmitter to a real drone during sim practice
Summary
- Choose a simulator by goal, FPV, line of sight or SITL, and know each one’s limits
- Mode 2 puts throttle and yaw on the left stick, pitch and roll on the right
- Sticks command relative to the aircraft, so the direction you see depends on heading
- Record conditions and events every round, and compare only rounds with the same conditions
Check your understanding
- In Mode 2, what does the right stick control?
- The nose points east (90°) and you push roll right. Which way does the drone go?
- How does SITL differ from an FPV hand-skills simulator?
- Round one used Loiter and round two Stabilize. Why can the times not be compared directly?
- Why use a data cable rather than a charging cable to connect a transmitter as a joystick?
Answers
- Pitch and roll
- South, towards a pilot facing north ()
- SITL runs the real flight-control software to test missions and modes; an FPV sim focuses on hand skills
- Conditions differ: Loiter holds position, so the difference may come from the assist rather than skill
- Some charging cables carry only power, so the computer cannot see the transmitter
Key formulas
| Travel direction for right roll | |
| East and north components |
Key references
- ArduPilot Dev Team. Radio control calibration (transmitter modes). ArduPilot Copter documentation. link
- QGroundControl. QGroundControl user guide. link
- ArduPilot Dev Team. Mission Planner simulation. Mission Planner documentation. link
- ArduPilot Dev Team. SITL simulator (software in the loop). link
- Federal Aviation Administration. (2016). Remote pilot – small unmanned aircraft systems study guide (FAA-G-8082-22). link
Further reading
Study the assigned knowledge units in advance, review media and take the module quiz
Getting started with drone simulation and flight training
USB transmitters and axis configuration
Flight-skills pathway: from simulator to field
Training plan from transmitter to simulated missions
In class / field
Lab or field practice from worksheets with a safety checklist
Learning evidence: Checked worksheets and quiz results